Sometimes When People Visit My Website Homepage, They Get An Error Related To Registration

Backup all files before experimenting with any solutions!

We just ran in to this problem and we finally narrowed the issue down with the help of Happiness Engineer Karen Arnold.  I wanted to keep the title broad in case someone hadn’t narrowed the issue down yet.  But, it seems after researching the problem, I’m guessing most likely your problem started AFTER you made your site into a WordPress Multisite.

Here’s your test:

  1. Clear your cache in your browser (so it doesn’t autofill your URL as you type it in).
  2. Enter your URL in the format mywebsite.com in your browser bar (without the “www”).  Does it bring up that Registration error?
  3. If it does, the good news is I think I can tell you what the problem is.
  4. If it doesn’t, this article probably won’t help you.

Here is the issue:  When creating a WordPress Multisite, you should install into the root URL, mwebsite.com, but many sites kind of drive you to installing to the http://www.mywebsite.com location (which is what we did).

So, what happens is if people enter your full web address, http://www.mywebsite.com, they get there just fine.  If they leave off the “www,” they see the error page and you get an email complaint.

Once we understood it was a Multisite problem related to the URL address, we searched on the web and found several helpful web threads that helped us grasp the situation.

It appears to be  tied to whether your site has registration disabled or enabled, but it’s actually just an end-result, not a cause.  We didn’t have registration enabled (located inyour settings on your dashboard).  The error came up either way.

SOLUTION 1
One, which seems to fix the problem for many people, suggests adding this line to your wp-config.php file:

define( ‘NOBLOGREDIRECT’, ‘www.yourwebsite.com’ )

(Replace “yourwebsite.com” with your URL).  Generally, you would find the file by going to your host, logging in and locating the file in your file manager.  Download a copy.  Then, use the host editor to edit the file if that’s an option.   Paste in the line where you see other lines that start with “define.”  Save the file, then reload the problem page and confirm it is actually going to the problem page (not auto correcting to the www version).  I think I’ll write a separate post on this process eventually because I don’t know of any sites that explain that.

As I understand it, since the website was installed in the wrong place, when someone types in the URL without the www, the website can’t find what it needs and creates that Registration error.

Here’s a thread on it:
http://jasoncosper.com/noblogredirect/

Unfortunately, that didn’t fix the problem for us, but it seemed to help a lot of people.

SO, then I found this thread:

SOLUTION 2

http://wordpress.org/support/topic/accessing-my-primary-url-without-the-www-redirects-to-signupphp

This person added the following code to the theme, functions.php file :

function ms_block_wp_signup() {

if( strpos( $_SERVER[‘SCRIPT_NAME’], ‘wp-signup.php’ ) !== false ) {

wp_redirect( get_option(‘siteurl’) );

die;

}

}

add_action(‘wp’, ‘ms_block_wp_signup’, 99);

This is out of my league in being able to follow it, but my best guess is that it blocks the site from trying to go to the sign-up page when it encounters the error.  This did not work for us, but some people had success and so I thought I would post it.

I then tried to go to the host and have them simply forward mysite.com to http://www.mysite.com.  I thought that was clever and simple, but unfortunately, http://www.mysite.com is in essence forwarding to mysite.com, so the additional forwarding creates a loop.

SOLUTION 3

After finally understanding the root of the issue, it seemed everything else was just a band aid solution and that what we needed to do was to move the site to the correct location.  I asked the host if they could do this for us, but they said it was a paid service solution at $75.  I hinted that it was just a simple copy/paste of folders, but the operator had concerns about the integrity of the databases, which I had heard before.  I figured we could handle the migration ourselves at that point.  I mentioned the operator’s reluctance to copy/paste folders to Our Happiness Engineer friend and she asked if the host knew if the site was a multisite.  I think she did.  Anyway, now we need to move our files from being physically located at http://www.mysite.com to mysite.com and I’m very confident that will solve our issue.  We decided to wait to do it after we could set aside a block of time.  I will update once we do that.  Here’s our plan:

  1. Backup the existing site.
  2. Export archive of the existing site.
  3. Try copying the files to mysite.com from http://www.mysite.com
  4. If that fails, delete files, install WordPress to the mysite.com location and import the contents.
  5. Test both http://www.mywebsite.com and mywebsite.com.

I will report back, wish us luck!


If You Use WP Super Cache or W3TC Total Cache Plugins, Update ASAP!

There is a security vulnerability that has been found.  Both Plugin designers worked quickly to “plug the leak,” but it requires that you update to the most recent versions.

More here from Tony Perez at Sucuri Blog…

http://blog.sucuri.net/2013/04/update-wp-super-cache-and-w3tc-immediately-remote-code-execution-vulnerability-disclosed.html

Creating and Adding a Paypal “Donate” Button to your Worpdress.com Widget Area

After noting more than 9000 visitors to my website, 90 daily hits and lots of positive feedback, I thought I better create an option for people to show some love.  I think I tried it early on, but was under the impression that WordPress.com did not like Paypal buttons in it’s widget area.  I don’t know if that has changed or if I just did not research hard enough back then, but here’s how ou do it:

OK, first, this help Support Thread does an exceptional job walking you through the process with enhanced screen captures and all.  No need for me to reinvent the wheel.  But I will supplement it with a couple of things.  First, I’d like to give you an overview of the strategy.  Then, I’ll mention a couple of pitfalls.  Here’s the general process they outline in the thread:

  1. Go to Paypal and create button in your Paypal acct under “Merchant Services,” not “Receive Money.”
  2. Copy the GIF image of the button you like from the bottom of the thread (you can also create your own).
  3. In a blank Post or Page, click on the “Text” tab and paste in the GIF code.
  4. Click on the “Visual” tab.
  5. Select the button image and add a link to it by clicking the Link button.
  6. From Paypal, copy the button code and paste it into your WP link.  Now, the button links to Paypal.
  7. Publish the Post or Page if that is your final intent.

In my case,  I wanted my Donate button to be contained in a widget.  To do this there are a couple of extra steps.

PITFALL ALERT:  First, before you get all ahead of yourself and skip reading the Support Thread, note that when you go to copy your code, don’t take it from the intuitive “Website” code box.  Widgets don’t like that code.  Take your code from the completely non-intuitive “Email” box.

  1. In the Post/Page, click back to the “Text” button and copy your new code.
  2. Go to APPEARANCE > WIDGETS and select a TEXT widget.  Add to the appropriate place .  Title if you wish a title to appear above your button.  Paste in your code.
  3. Save.
  4. Check for effect
  5. Consider “testing” my new “Donate” button.

This is all really logical.  I thought there would be some other weird things that needed to happen because of the security restrictions of both WP and PP.  But, after getting the guidance to get around the pitfalls, it was rather easy!


Embed Google Calendar In Your WordPress.Com or WordPress.org Website Page/Post

This was just so easy, I just want to have babies with Google.

OK, I create a lot of simple free/inexpensive sites for non-profits or local groups that just need to communicate better.  Most of them are comprised of senior citizens or people who are not that interested in becoming WordPress savvy.  I like cool calendars, but sometimes  organizations just need the simplest path from A to B.

So, here’s my suggestion.  (I’m not going to go in to the detailed ‘How To’ or the Google stuff):

  1. Establish a Google Calendar and make it public.  
  2. Add group members to the calendar so they can edit it.  Have them populate the calendar and get familiar with the Google updating.
  3. In the Google Calendar, left bar under “My Calendars” go to the new shared calendar and click on the triangle drop down to the right of that calendar.  Scroll down to “Calendar Settings,” (NOT “Share Calendar”).
  4. In Calendar Settings, scroll to “Embed This Calendar” and grab the code.
  5. Go back to your WP website.  In my case, I create a page called “Calendar” or “Events” (and add it to your custom Menu if necessary).  Click on the “Text” tab of your content area and paste in the calendar.
  6. Publish!
  7. Go to your website and check out your awesomeness.
  8. Consider donating to my site.

I think this is going to be a killer option for many of the groups I work with.  Now, to update their calendar, they can have any team member update directly from Google without having to touch WordPress at all.  The calendar is dynamic.  You can click to see details, flip through months and subscribe to the calendar.


Using Google Gmail to Email a Post to a WordPress.org Website

This is just the coolest and most underutilized bell/whistle on WP.  OK, you may or may not know that they have an option to post to your blog simply by sending an email to a specific email address.  It’s great for lazy/busy people who just need to post without the hassle of logging in.  You can compose the body and add pictures (I think).  The subject line becomes the title.  It’s also good if you have a couple of contributors, especially if they are not eager to “learn an new program.”  just tell them to email their post to the secret address.

In WordPress.com, it’s very easy and built into the system.  Go to SETTINGS > WRITING and you will see:

Post by Email

You can publish posts using emails with the Post by Email feature. To enable this visit your My Blogs page and create a secret address.

Follow instructions.

But, WordPress.org is a different animal.  I got intimidated  and just put it aside for a long time.  But, now that I’ve done it, it was fairly easy!  You need to set up a secret email account somewhere that is dedicated to receiving posts for a particular blog.  I was eager to try using Gmail.  It worked and was fairly easy, but there were a couple of pitfalls.

Here’s what I learned:

1. Set up a free Gmail account at mail.Google.com Use a unique email address.  Hint:  You don’t have to enter a backup email address to set up the new email.  WP suggests using a random letter/number string, but I created an odd phrase that would be easy to share with other members.

2.  In your WordPress.org website, install the plugin POSTIE.  You can do it without this option, but Postie has one particular feature I was interested in. The emailed posts will default as a “Pending Post.”  Postie has an option to check for those pending emailed posts and post them automatically.   You can have it check anywhere from daily to every 5 minutes.  Go to SETTINGS > POSTIE and go through the options.

3.  Thank you to this link for some helpful redirection and encouragement: http://wordpress.org/support/topic/post-to-wordpress-through-gmail  For Gmail, you’ll want to use the following configurations (type exactly):

Account: ssl://pop.gmail.com
Use port: 995
Enter the secret Gmail email address and password you’ve created.
Set your ‘check for posts’ interval.  Send a test post to the new email address.

In gmail (or other), use active pop protocol (I didn’t have to configure anything on the Gmail side)

It worked and I am excited to share the new process with the group.

UPDATE:  7/24/2013
This was embarrassing–I set this cool little feature up on a non-profit website.  I started getting all sorts of strange postings on the website from Gmail.   I realized Gmail was sending this newly created hidden email account spam.  Well, at least it wasn’t posting Viagra ads or the like.  Good news is you CAN turn the spam off!  Here’s how:

1.  Log into your secret posting Gmail account.
2. Go to ACCOUNTS > Google+ (totally not the intuitive place to go for this, so it took me a while to find).
3. Scroll to ”

Manage subscriptions
Occasional updates about Google+ activity and friend suggestionsand UNCHECK!

Then, under

Receive notifications
Notify me by email or SMS when someone..
UNCHECK all of these.
That should do it for now (these settings are always changing).  You don’t have to save, but should see a message that the information has been updated.
Remember, ANYONE who sends an email to your secret email address will post to your website, so don’t share the address anywhere unsecure!

Speaking of Cloud Apps, Here’s a Handy (And Free) Hard Drive in Cyber Space! [Dropbox]

I’m a Mac girl.  When the great shut-down of dotMac occurred this year, I lost many critical  functions that helped my workflow.  One of those functions was an online repository for files that could easily be shared with clients and friends.  It was great for exchanging:

  • large files that were too big for email.
  • many files, like a photo collection.
  • creating a static spot where ongoing clients could reliably find files.
  • sharing files cross-platform (Mac to PC).

To date, all of the Cloud Applications designed to mimic the dotMac file sharing system were poor replacements–cumbersome, slow and usually pricey. But, on the Apple forums, I kept hearing about Dropbox as a vviable substitute.  In a punch, I reluctantly gave it a try and I am so happy I did.  It’s actually BETTER than the system I used before.  It is totally seamless, allowing me to share files with (good access and security control) simply by dragging and dropping to a folder located on my desktop–no logging in to a website!  I am so addicted.

What makes it different is that you actually download and install the program onto your local computer.  This allows you to create that seamless environment where the Dropbox becomes a little drive on your computer that you can access anytime, although you do need an internet connection.

To be fair, I have had an occasional client complain that they could not access shared files, but those clients are usually my less tech-savvy clients, so I think they get put off by the registration process.

In relation to WordPress, there are already a host of WordPress plug-ins that support Dropbox integration.  Notably, WordPress to Dropbox backup seems handy (I have not tried it!).  Here is a good article on 9 handy Dropbox-related plug-ins for WordPress from WPMU.org.

Anyway, Dropbox has an affiliate program.  If you sign up (which you totally should–you will thank me) using my affiliate link below, they will credit me with more Hard Drive space.  Thank you in advance, but really this is one of the best and useful Cloud Apps I have used to date.  You can then share your own affiliate link with your circle to get more disk space yourself.

Click on the image or go to http://db.tt/aDUAljq2

Wordcamp 2012 Presentation: Using Cloud Apps To Enhance Your Site

Just had the honor of presenting my WordPress topic at Wordcamp 2012 this past weekend.

I will add the video link once it’s uploaded to WordPress.tv.

Here are my slides on the official Wordcamp ABQ 2012 site.

I already wrote about how I got the idea for the presentation.  But, I wanted to drop in highlights and examples as I promised attendees I would give them resources shown in the presentation.

First, I did get a chance to showcase one of my favorite WordPress supplements, Headway Themes during lunch.  It is a premium advanced theme that you can install in WordPress and design your site in a drag-and-drop environment.  To disclose, I am an official affiliate representative and will receive a commission if you click on the link/logo and purchase the product (which I would appreciate, of course).  But, anyone who has seen me professing about Headway knows I just love it so and believe every WordPress user should at least see it demonstrated.

Headway is currently priced at $87/basic or $174/advanced, both offer UNLIMITED INSTALLS!  This gives you access for one year to support and updates.  Renewal is discounted.  Best money I have spent on an app yet!

Click on the logo to purchase Headway Theme using my affiliate link.

OK, back to the presentation.  In the seminar, I covered 4 main Cloud Applications that I have personally reviewed and actively used on professional sites.  I do not have affiliate relationships with any of the following products and promote them from shear enthusiasm!

Here are the example sites used:
www.IvoryKnot.com (our mock client)
www.DelgadoArts.com (BigCartel storefront)
www.SpanishColonial.org (Zoho artist database and Wufoo Forms membership form)
www.ShaneCasiasDesigns.com (Photobucket gallery & BigCartel storefront)

Here are the Featured Cloud Apps:

1. PICTURE GALLERIES:  www.photobucket.com (demonstrated) Free account with options to sell products.  www.photoshelter.com for very advanced users.

2. FORMS:  www.wufoo.com (demonstrated) free for minimal use.  Paid subscription required if you want to receive payments within the form via Paypal.  www.123forms.com for Non-profits who are taking advantage of Google Grants.  If you are a Non-Profit who has yet to take advantage of Google For Non-Profits generous grant option, please contact me for a free review on that (sly@twilightstudio.com).

3. DATABASE:  www.zoho.com/creator Free up to 3 databases.

4. ONLINE STOREFRONT:  www.bigcartel.com Free for up to 5 products.

DIRECTIONS FOR http://www.PhotoBucket Gallery:
Create your album.  Under “Share This Album” on the right, click “See More.”  A pop-up will open.  Click the “Get Link Code” tab.  Then click “advanced option” on the bottom.  Adjust the slideshow size to your liking.  Copy/paste the entire section that starts with “<div style…”  It should look something like this:

Return to WordPress.  Paste that code into your “HTML” tab in the content box of the page or post where you want hte slideshow to appear.  You can adjust the width and height numbers in red above to change the size of your image.  Just make sure they are proportional to the above.  You can change the alignment of the gallery to “left” “center” or “right” (shown in red above as “right”).  You can also delete the entire part highlighted in red at the bottom if you don’t want the extra links to appear and desire a sleeker look.

Photoshelter WordPress Plug-in!  One of the attendees informed me that Photoshelter just announced a WordPress Plug-in.  I have not tried it, but here is the link from the website describing the plug-in:
http://www.photoshelter.com/mem/home/help/tut/market/plugin

More directions coming…

Cool, I just Figured Out How To Center Background Images In Headway 3.22!

OK, this is a post to myself so I can remember how I did this.  First, sending out love to:
http://webdesignerwall.com/tutorials/how-to-css-large-background who gave me  a starting point to try adjusting this.

I love creating cool background images for my websites.  When I first started designing, creating large background images was taboo because it would create slow upload times for visitors.  But, the speed of the internet for the most part has caught up with us.

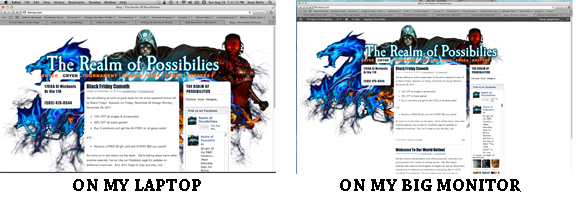
Using Headway, I can easily plop in my background images.  Then, I can play with transparency and layering items on top.  Most of the time, I’ve made the image so big that it fills most laptop screens, but the effect is always lost on large monitors when the background picture slides to the left.  By default, background images are placed left top.

centering a background image

This site shown above was built in Headway 2.x.  I could not get the fix to work on it.  But I did get it to work on my Ivory Knot site which runs Headway 3.22.

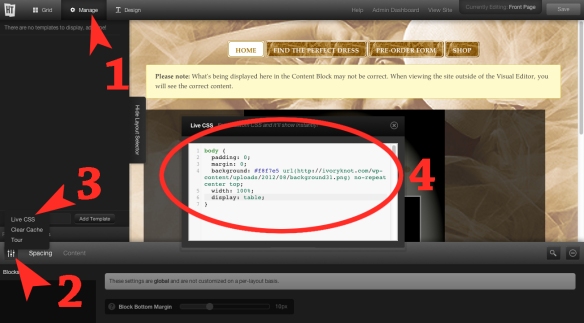
From the Headway Visual Editor, select the “Live CSS option.”  It’s really hard to find now, but I’m guessing they will make it less obscure in future versions.  Here’s a screenshot how to activate it currently:

finding the Live CSS Editor in Headway 3.22

In step 4, paste in the code below:

body {
  padding: 0;
  margin: 0;
  background: #ffffff url (http://replace_this_area_with_the_URL_of_your_image.jpg) no-repeat center top;
  width: 100%;
  display: table;
}
Replace the red text with the URL of your background image.  It must be on the web.  YOu can get it on the web by uploading it through the Media section of your dashboard.  When you upload it, copy the URL that it gives you.
I’ also figured out you could replace the word “top” (which appears after “center”) with “center” and your image will center top to bottom!  I’m sure you could use “left” for left horizontal alignment and “bottom” for bottom alignment, too.
Check out my successfully edited website www.ivoryknot.com to see centered background image in action.
You should be able to see the change immediately when you paste the code above in the CSS box.  Save and confirm!  Yay!